
Thinking back, I don’t recall experiencing that many smooth hardware upgrades. Even when everything worked, I was nervous about messing something up or having to redo things. This fear is one reason why I don’t shut the cover on the console until after I’m done and I turn on the unit to confirm that everything works as expected.
From Monday’s post, trying to remove the old display adapter proved problematic: The hard drive was in the way. Further, the new RAM I installed was in the way of the hard drive. I’d have to undo my RAM installation to back-out the hard drive and free the display adapter, snuggly installed in the console’s case.
By the way, display adapters have several connections you must loose before the card can be removed: The video cable, the screw(s) mounting the card to the console, the clip on the PCI expansion slot (people forget this one all the time), and the card’s internal power connector.
After removing the old display adapter, I became concerned that the new one would be too big! I set them astride each other, shown in Figure 1, and to my relief, the new one was slightly smaller than the old. (The picture show them lined-up perfectly, but the new one is shorter.)
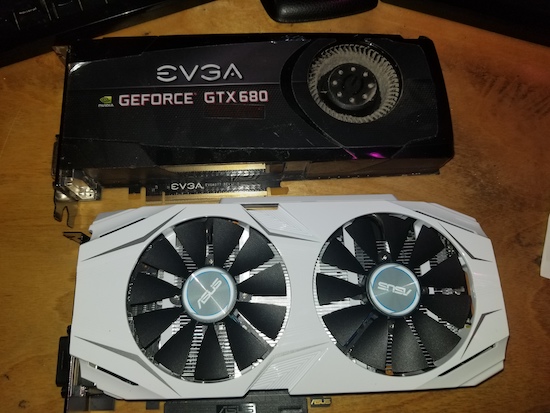
Figure 1. The old display adapter (top) is just a hair longer than its replacement (bottom).
Once freed, I was easily able to insert the new card. In Figure 2, you see the new card sitting in its slot. I’ve screwed it in place and anchored the card edge to the PCI expansion slot. It still needs the internal power supply connected, which is lying on the ground in the photo.
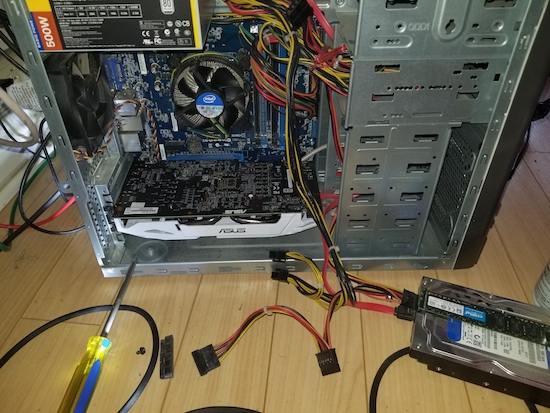
Figure 2. The new display adapter is installed. Note the removed hard drive on the lower right, along with the 8GB DIMM resting on top.
With the card in place, I re-inserted the hard drive. I tried to put it up in a higher drive bay, but the drive wouldn’t mount unless I removed the processor’s fan. Loathe to do that, I opted to install the drive back into its original slot. Then I re-inserted the memory card. Figure 3 shows the final assembly with the power on. Everything worked!

Figure 3. It’s working, though I could have done a better job cleaning those fans.
I didn’t screw up the memory card after re-installing it; the system still showed the full 16GB of RAM. I was eager to also check the display adapter card’s properties. I offer specific steps in an earlier post. Figure 4 shows the result.

Figure 4. The result. I now have a GeForce GTX 1060 in my PC’s bosom.
The upgrade was a success and my PC now plays games without pause or complaint. In fact, according to the Properties dialog box in Figure 4, the system has about 14GB of graphics memory at its disposal. Oooff.
My next upgrade might be a better monitor. I have a 21-inch monitor that’s okay, but the newer monitors are much cheaper and better. That upgrade, of course, will be far easier than risking life and limb venturing inside a PC console.
