
As I struggled playing FarCry 5, my son matter-of-factly asked, “Dad, you bought all that stuff for your computer. Why don’t you install it already?”
And so I did.
I powered down Windows and unplugged the PC’s console. Always remember to remove the power plug from the console when you perform an upgrade! Oh, and you must have a console or “computer box” to do the upgrade. Many small format and all-in-one PCs lack any upgrade path. I buy consoles specifically so that I can add and replace gizmos, which was my goal.
For this upgrade, I had both an 8GB DIMM from Crucial and a GeForce 1060 from Asus that I ordered on Amazon. (See last Thursday’s post.) Instead of installing both at once, I did the upgrades one component at a time. This precaution helps with troubleshooting when something goes awry.
First to pop in was the memory.
I removed the console cover and located the memory banks, as illustrated in Figure 1. And, yes, the console was dusty inside, so (after I took the picture), I used a vacuum and can of air to clean the fans and vents.

Figure 1. Memory banks on my PC’s motherboard.
The memory banks are color-coded, blue and black. The first blue bank (the second memory bank over) had an 8GB DIMM installed. The match up the new 8GB memory card, I chose the second blue bank (off to the right in the green box in Figure 1). These slots weren’t arranged as the CrucialScan software predicted, but this wasn’t an issue.
Upgrading memory is relatively simple, especially when you forget that you paid almost $100 for something roughly the size of a pocket comb: You pull back the clips on either end of the slot. Orient the DIMM so that the notch lines-up with the gap in the slot; you can’t plug in the thing backwards. Press the DIMM firmly into the slow until the clips close. You can manually close the clips if they don’t snap into place.
After getting the DIMM into the memory slot, I plugged in the console, then powered on the system. I pressed Win+Break to view the System window and, lo and behold, I had my 16GB of RAM total. The new value is shown in Figure 2.
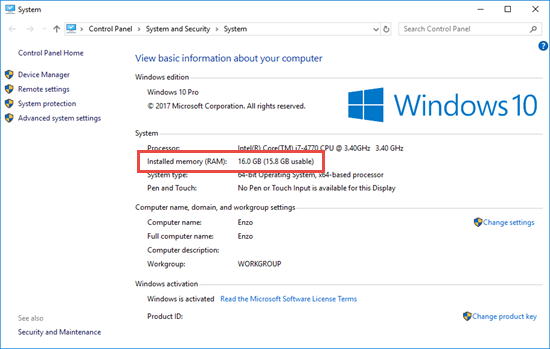
Figure 2. 16GB of RAM. Yup.
The next phase was to remove the existing display adapter and install my new GeForce GTX 1060, but there was a slight problem, shown in Figure 3.
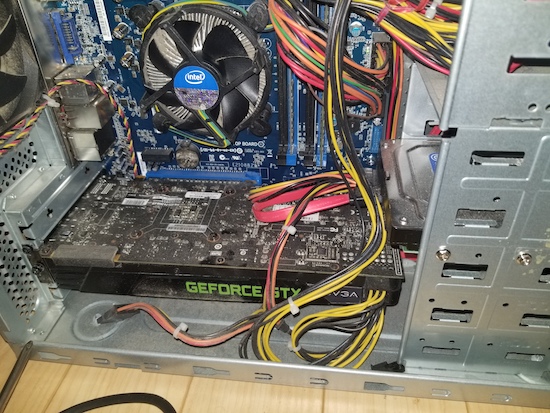
Figure 3. Today’s smaller consoles often require you jam in components.
The old 680 display adapter card barely fit into the console. In fact, if you look closely at Figure 3, you see that the hard drive (center right) sticks out over the card. To remove the card, I must first remove the hard drive.
When I went to remove the hard drive, I discovered another problem: The newly-installed 8GB DIMM card was too tall to let me back-out the hard drive. Yes, I’d have to uninstall both the new DIMM and hard drive just to remove the old display adapter.
My precarious upgrade saga continues with Thursday’s blog post.
