
It started out as the Status Bar. Some Windows veterans may still refer to it that way, but somewhere along the line the name changed: Notification Area. It’s that spot on the far right of the Windows taskbar that overflows with teensy icons — or not, depending on how it’s configured.
First, a gripe:
(Did you expect anything else?)
The little icons are handy, but grossly inconsistent. For example, some of them you can click on to see a pop-up menu or access features. Others require that you double-click. Still others function only when you right-click.
Hello, Microsoft! How about some consistency guidelines?
Anyway, I prefer to show all the icons on my desktop. That’s fine, as long as they don’t start crowding into the rest of the taskbar area. Because most folks have widescreen monitors, that crowding probably isn’t an issue.
Figure 1 shows my PC’s armada of notification icons. They occupy about 20 percent of the taskbar’s real estate.
Figure 1. Notification icons, all lined up and ready for action.
To show all the notification icons, heed these steps:
- Right-click on the time: it’s found at the far end of the taskbar (well, unless you removed that display, but I’m not going there).
- Choose the command, Customize Notification Icons.
- In the Notification Area Icons window (Figure 2), place a checkmark by the item Always Show All Icons and Notifications on the Taskbar. It’s found in the lower left corner of the window.
- Click OK.
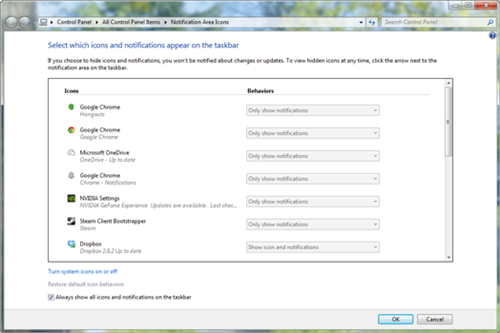
Figure 2. The Notification Area Icons window.
And the all the icons appear, like everyone in town showing up for the village picnic (Figure 1).
If you want only selected icons to appear, and hide some of the ones you really don’t care about, then remove the checkmark by the Always Show All item. At that point, you can scroll through the list and choose which icons to show and when to show them.
The list (Figure 2) shows all potential icons that can show up. Next to each icon you’ll find a menu button thing. Three options are available:
Show Icon and Notifications. Choose this option to always show the icon, no matter what.
Hide Icon and Notifications. Choose this option to hide the icon and any notifications (pop-up bubbles) it may generate.
Only Show Notifications. Choose this option and the icon appears only when something’s up, such as a file update, virus alert, new email, and so on.
When you’re finished setting options, click the OK button. The Notifications obey you, and you’ll see some, all, or none, depending on the settings.
