
The AutoCorrect shortcut was gracelessly dropped from Word version 2010. Two workarounds are available, though they’re just not the same.
As a reminder, way back when (in earlier versions of Word), you could fix a spelling error by right-clicking on the word and choosing a proper word from the AutoCorrect list. For example, you right-click the word teh (which is already an AutoCorrect entry) and you direct Word to automatically replace it with the word the.
Word features a slate of AutoCorrect entries, but the AutoCorrect command allowed you to quickly create your own. That shortcut is missing from Word versions 2010 onward.
One option instead of AutoCorrect is to add an improperly-flagged word to the dictionary. For example, if you live on Pilchuck Avenue, you can right-click the word Pilchuck and choose the Add command. The word is inserted into your personal dictionary and won’t be flagged as misspelled again.
Adding a word to the dictionary, however, doesn’t automatically fix words that you mistype.
For example, say you type lod instead of old. Adding lod to the dictionary doesn’t fix that typo; it merely tells the spell-checker to ignore the word. That’s not what you want. No, you want to type l-o-d and have Word automatically correct it to o-l-d for you. That’s AutoCorrect.
Because you can’t right-click lod any longer, you must create a manual AutoCorrect entry:
1. Click the File tab and choose Options.
2. Choose Proofing from the left side of the Word Options dialog box.
3. Click the AutoCorrect Options button.
The AutoCorrect dialog box appears, with the AutoCorrect tab forward, shown in Figure 1.
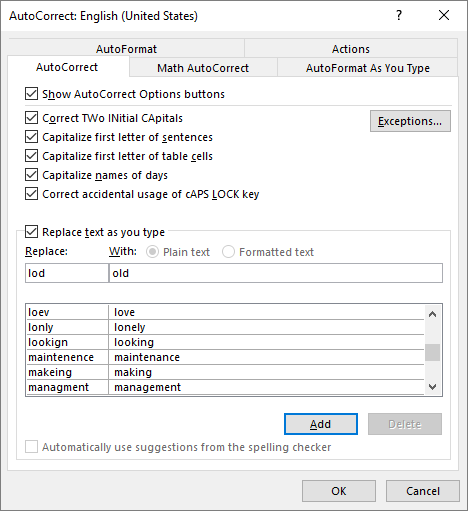
Figure 1. Manually adding an AutoCorrect entry.
4. Click the Replace text box and type the word you want to correct automatically, such as lod.
5. Click the With box and type the replacement word, such as old.
6. Click the Add button to create the new AutoCorrect entry.
7. Repeat Steps 4 through 6 for each word you want to add.
8. Click the OK button when you’re done adding AutoCorrect entries, then click OK to close the Word Options dialog box.
Yes, these steps are a pain. They remove the automatic aspect of AutoCorrect, requiring you to remember which words you want corrected as well as adding them to the list yourself.
For more text-inserting tricks in Microsoft Word, see my 2013 post on AutoText here.
