
Microsoft trained everyone to love AutoText from Word zero through Word 2003. Then that happy feature was abused in Word 2007, mugged in Word 2010, and stands for execution in the up-coming Word 2013. What’s an Autotext lover to do?
I’ve written before about how AutoText was replaced by the Quick Parts feature.
It’s just not the same!
If you really want something like AutoText, then you need to follow a specific workaround in Word 2010/2007 (and soon-to-be Word 2013):
1. Type the AutoText you want to reproduce.
For example, it could be your name, though your name is already a Quick Part providing you set up Word yourself. I chose my company’s name, Quantum Particle Bottling. Other items to place into AutoText include your address, City name, or any other text you would type frequently, including a report title, project name, and so on.
2. Select that text.
Ensure that you select only the text you want in the AutoText entry. If the text is on a line by itself, then you may also select the “Enter” key press at the end of the line. Only select that item — or any other punctuation — if you want it to be part of the AutoText entry.
To better select the text, click the Show Hide ¶ button to see what you’re selecting in Word.
3. On the Insert tab, choose Quick Parts, Save Selection to Quick Part Gallery.
You see the Create New Building Block dialog box, similar to what’s shown in Figure 1.
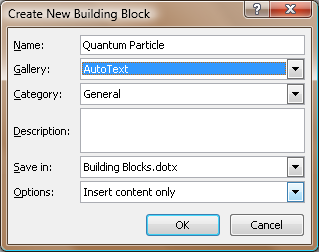
Figure 1. The Create New Building Block dialog box.
Here’s what each item means in that dialog box:
Name. This item looks like the AutoText entry, but it’s not. It’s merely a title for the entry. Feel free to edit it if it’s too long or needs to be more descriptive.
Gallery. This item chooses where the building block is stored. It helps determine how the text is used and also which command summons the text. For an AutoText entry, you want this item to be AutoText.
Category. This item allows for further organization, though I’m not sure when that organization comes into play for an AutoText entry. It does show up when you view the Quick Parts Gallery as “Category” is its own column.
Description. Use this field to add optional text describing the item. I leave it blank.
Save In. This item tells Word in which file to save the AutoText entry. The suggestion (shown in Figure 1) is the Building Blocks.dotx template file. That’s a general template where Word stores preview items and other tidbits. Another alternative is to choose the Normal.dotx template or, if your document has its own template, to choose that template instead. I recommend that option if you want the AutoText building block item thing to be available to only those documents using the same template.
Options. This item chooses how the AutoText is inserted. The setting Insert Contents Only is probably the one you want; that inserts the text as if you’ve typed it.
4. In the Create New Building Block dialog box, choose AutoText from the Gallery drop-down menu.
That’s really the only option you need to set.
5. Click OK.
The AutoText building block item is created.
To use the AutoText entry, type the first few letters of the text, then press the F3 key. That’s how you do AutoText, and if you practice a few times you’ll remember the weirdo F3 key press.

There’s an off-chance that you may see a warning when you quit Word, something about saving the Building Blocks.dotx template file. Do so: Choose to save that item. That way your AutoText entry is always available in the future.
