
I highly recommend that you perform some type of backup. Windows Backup is almost a good program. Its major weakness remains that once your external backup drive gets full, Windows Backup is utterly helpless. That sucks.
In Figure 1, you see the condition of a Windows 7 PC that’s been running backup for months. The backup drive’s thermometer bar is full-on red. That means that the disk is overflowing with crap. It also means that the Windows 7 Backup program has utterly failed at pruning away older backups. The end result is that backup activity stops. This situation is horrible and stupid.
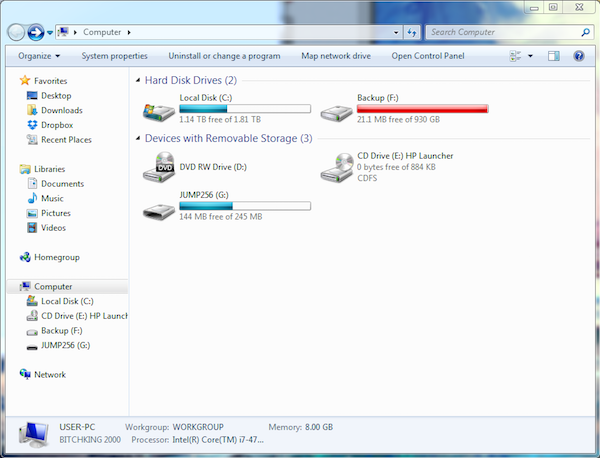
Figure 1. The PC’s external backup hard drive is too full to accommodate further backups.
Even more appalling is that the Backup program is apparently aware of the situation. If you run the Backup and Restore utility, you see a prompt at the top of the window, similar to what’s shown in Figure 2. I mean, really?
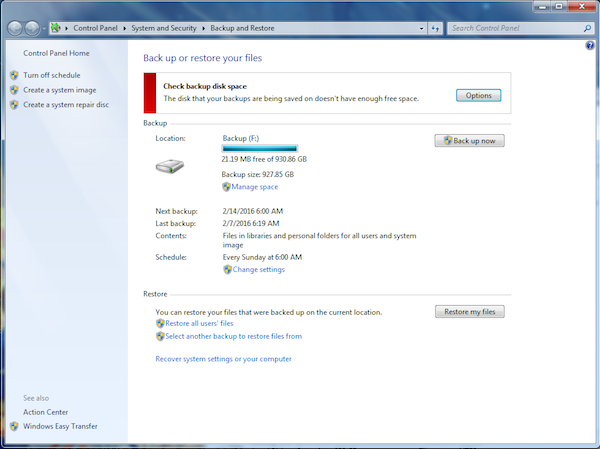
Figure 2. Backup is apparently aware of the situation, but unable to deal with it.
You can click the Options button and work through the three potential solutions. One of them is to manually go through your backups and remove them. That would take a lot of time. In fact, all the options consume a lot of time, which is why I ignore this approach.
My solution is drastic, but it’s what you must do if you want to tolerate using the feeble Windows 7 Backup utility: Reformat the backup drive.
Yes, this option is scary. It means between the time you reformat and then start the new backup regime, your PC’s data is at risk. That’s really the second worse thing that could happen. The first has already taken place: Your PC isn’t being backed up because the media is full! That’s obnoxious.
To reformat and start over:
1. Open the My Computer window.
2. Right-click on the external drive you use for backup; look for the red bar (see Figure 1).
3. Choose Format.
4. In the Format dialog box, click the Start button; all the other options are fine. You want a Quick backup and there’s no need to reset anything else.
5. Wait for the drive to finish formatting.
6. Start the Backup utility: Press the Win key and type backup. Click the Backup and Restore program.
7. In the Backup utility window (see Figure 2), click the button Back Up Now.
8. Wait.
After several minutes (perhaps an hour for a lot of data), you’ll have your initial backup set and ready. At that point, backup should proceed on the schedule you’ve set — that is, until the external storage media gets full again. In that case, you can repeat these steps, or get a better backup program, one that manages your backup sets in a logical and sane manner, removing older ones so that the darn disk does overflow.
