
Unless you tell it otherwise, Microsoft Word believes any picture in your document to be one, large, single character. It jiggles and jostles around the text as you edit and add. That may be exactly what you want, or it may drive you nuts. Not to worry: You can fix the picture by changing its layout.
Monday’s blog post reviewed the method for inserting a picture or image into your document. It also covered changing the image’s size or rotating the image.
The key to setting the image’s layout is to click the Layout Options button, which is found lingering near the image’s upper right corner. Click the image to see that button, then click the button to see its options, shown in Figure 1.
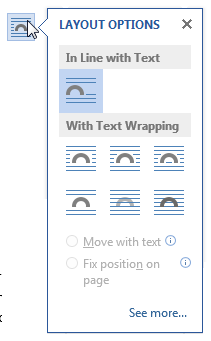
Figure 1. The Layout Options palette shows your choices for how the image appears on a page of text.
If you’re okay with having the picture work like a large single character, then keep the option In Line With Text. That icon is what shows up in the upper right corner of the image.
The other options for image layout can be divided into two categories: Wrapped or Outside of the Text.
The Wrapped options are highlighted in Figure 2.
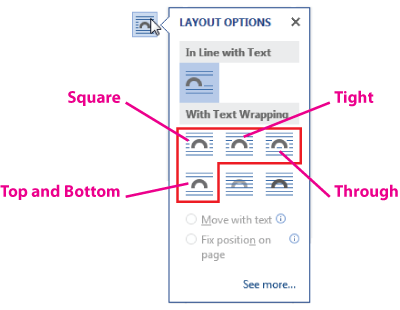
Figure 2. The wrapped options for an image.
Each of these options keeps the image inline with your text, but the text wraps around the image in one of four ways: Square, Tight, Through, or Top and Bottom. I could describe each option, but their names and representative icons are pretty descriptive with regards to how the text wraps.
When you choose a wrapping option, the image is no longer treated as a character in the text. It is, however, anchored to a specific paragraph. You actually see the anchor in the document when the image is selected, which is shown in Figure 3.
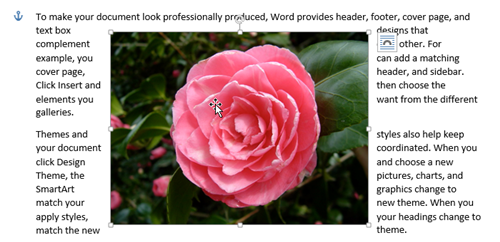
Figure 3. The anchor appears next to the image’s paragraph. Here the image is formatted with Square wrapping.
You can’t move the anchor, but you can move the image: Drag it around to properly position it. The anchor moves with the image, showing which paragraph the image is associated with. That way as you edit and add to your document, the image won’t get lost or end up on the wrong page.
The Outside of Text options are highlighted in Figure 4. Only two are available: Behind Text and In Front of Text.
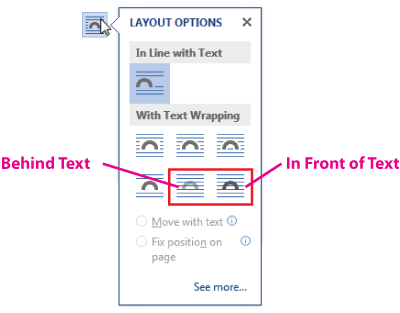
Figure 4. Options for setting the image outside of the text.
When you choose either option, you’re removing the image from the text and placing it either in the background (Behind Text) or pasting it on top of the text (In Front of Text). Figure 5 illustrates both options.
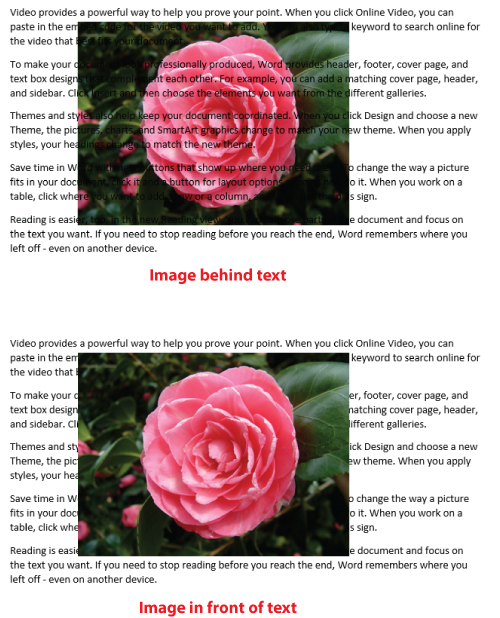
Figure 5. Options for image layout outside of the text.
In these positions, you can move the image around without affecting the text and the image sticks to the page that way. The images are still anchored to a paragraph, as shown by the Anchor icon (not visible in Figure 5).
Also, when you layout an image outside of the text, it makes it more difficult to click on the image to edit. It’s rare, however to use these layout options. I prefer to use either the In Line with Text option or the Square formatting layout in my documents.
Also also, I wrote a blog post several years ago on image formatting. It’s specific to older versions of Word, but a lot of the information still applies: Click here to read it.
Finally also, see my Word Tip video on Layout options: https://www.youtube.com/watch?v=f4sgldHNxiQ
