Allow me to drag myself, kicking and screaming, into a frightening realm of what Microsoft Word attempts to do when formatting images.
In my Word For Dummies books, my mantra is clear: Word is a word processor. It works best with text. When you want to mix in images and add fancy formatting and such, you’re better off using a Desktop Publishing (DTP) program.
My DTP program is Adobe InDesign, but it’s not for everyone. The program I recommend is Microsoft Publisher, though I’ve never used it. (I’m afraid that should I use it I would find out that it sucks and then I’d have to make up something else to recommend for DTP.)
Let me start with something simple, however: Basic image formating.
I only lightly touch upon image formatting in my books. While I know a lot about it, and there are interesting options, there just isn’t room in my Word books to do the topic justice.
If you like, consider writing to my publisher and telling them that I need to write the book Dan Gookin’s Zillion Word Tips, which I feel would be a bestseller, but the publisher is somehow nonplussed.
Basic Operation: Inserting a Picture Into Your Document
Before you can format an image, you need an image in your document. The operation is one of the more simpler things Word, does, though the presentation is poor.
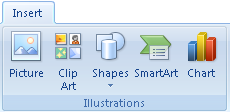
Anytime you’re inserting something into your document, you’re using the Insert tab in Word 2010/2007. There are five basic things to insert:
Word 2010 adds a Screenshot button/menu to the mix. Even so, the two most worthy options are Picture and Shapes.
Picture lets you insert an image you’ve saved on your computer. Choose the image using the Insert Picture dialog box. Word can swallow any common graphics file type. I recommend using high-resolution TIFF images. Unlike PNG, JPEG, and GIF, TIFF images are designed for documents, not the Web.
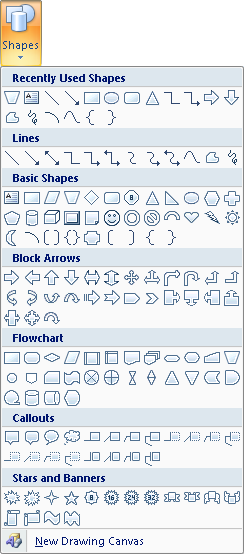
Shapes lets you squirt a predesigned piece of line art into the document. Clicking the Shapes button displays a palette of lines, boxes, and shapes of common and useful sizes:

Fig 2. The Shapes button menu thing.
It’s also possible to build your own shapes by combining existing shapes. Even so, I would recommend that you use a line art program to create such complex shapes: You’ll be happier by doing so, as Word is not a graphics program and working with graphics in Word proves that statement to be true.
The other items in the Illustrations area are rather silly:
Clip Art is really limited, which means when you use one of those images everyone instantly recognizes it as Silly Office Clipart™.
The Smart Art option is interesting, but clunky and, again, reeks of “everyone else does this.”
Finally, choosing the Chart item whisks you off in Excel, which is confusing enough so I’ll leave that option alone.
The first thing you notice after slapping an image down in your document is that the image acts just like the document’s text. In fact, the image is treated like a big, single character. It moves along with a line of text as you edit, it flops from one page to another, and it’s otherwise just a mess.
Obviously the first thing you want to do with your artwork is free it up from the confines of your document’s text. You can do that in several ways, all covered in my next blog post.


