
It’s one of the most simple photo-editing operations, probably something you may have done with a photograph in the real world. Cropping involves removing a portion of an image, such as using scissors to snip out an unwanted relative or regrettable prom date.
Forget using scissors on an image on the computer monitor.
To crop an image you need the image, of course. Plus you need some sort of image-editing program.
A photo editor is the perfect tool, and it contains a ton of other editing tools that let you fix color problems, red eye, and even swap heads on bodies if you’re good enough. Even a basic picture editor, like the Paint program that comes with Windows, can be used to crop an image.
To get started, open the image for editing: Locate the image file you want to crop. This may in fact be the most difficult step.
Once you’ve found the file, right-click its icon and choose the Edit command. Odds are good that image opens in Paint, if not it should open in another image-editing program, probably one with better tools.
Next, locate the Crop tool. The tool’s common icon is shown in Figure 1, although the icon could be a variation on that basic theme. Select the portion of the image to keep by using the Crop tool. Bingo! You’re done; save the image. Sadly, things don’t work that neatly in the Windows Paint program.

Figure 1. The universal crop tool icon.
In Paint you can quickly crop by dragging the bottom and right edges of the canvas, shown in Figure 2. Simple.
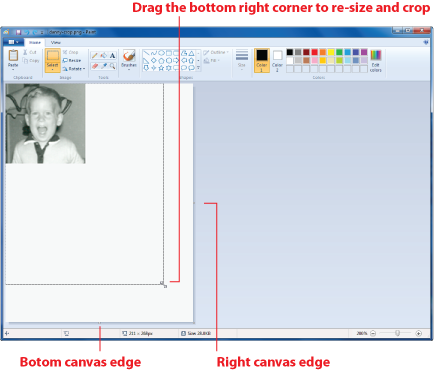
Figure 2. Changing the image’s canvas size in Paint.
When you need to crop to a central part of the image, however, you need to crop by selecting and then cropping, as illustrated in Figure 3.
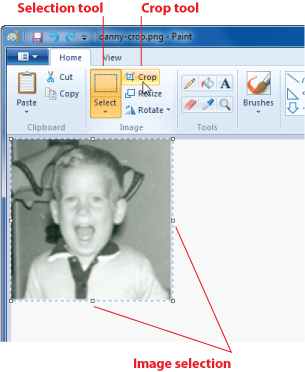
Figure 3. Selecting and then cropping the image.
First, select the part of the image that you want to keep: Choose the Select tool and drag over that part of the image, similar to what’s shown in Figure 3.
Don’t mess with the selection! Don’t try to refine or adjust it. If you do, you’ll re-size the image, which isn’t what you want. So if you screw up selection, press Ctrl+Z to undo and then choose the Select tool again to start over.
To crop out everything but the selected part of the image, click the Crop tool. Thwoop! You’re done.
At this point you can save the cropped image. The end result is something less-embarrassing than an over-scanned image, which was the topic of last week’s Friday blog post.
