
Word isn’t a drawing program, but it contains drawing tools. So you might be frustrated when you try to design drawing elements and Word isn’t very helpful with your efforts. One specific area has to do with custom colors.
The way Microsoft would prefer that you deal with colors is to use a Document Theme. Let me be honest: That tool sucks. I don’t know anyone who uses it. And it’s not very helpful for creating and applying a new color to an object, let alone saving that color and quickly allowing you to use it again.
To see how this works, open a new document in Word and slap down a shape:
- Click the Insert tab.
- In the Illustrations group, click the Shapes button to choose a shape from the abundantly stocked list.
- Drag the mouse in your document to create and size the selected shape.
The shape you create floats over the text, which is fine for now. To continue designing the shape, you can select an outline style as well as fill color. This options are found on the Drawing Tools Format tab, in the Shape Styles area. You can also use the Shape Styles gallery to pluck out a predefined format for the shape.
To set a custom color for a shape, abide by these steps:
- Click to select the shape.
- Click the Drawing Tools Format tab.
- In the Shape Styles group, click the Shape Fill button and choose More Fill Colors from the menu.
- Manipulate the Colors dialog box to set the color you desire, as shown in Figure 1.
- Click the OK button to apply that color to the shape.
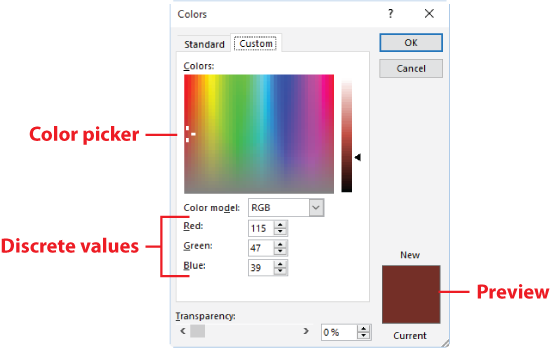
Figure 1. Using the Color dialog box.
Any other shapes you insert into the document carry the same line and color format as the first shape. If you apply another custom color, then new shapes carry that color. To use that specific color again, you can choose your custom color from the Shape Fill menu, shown in Figure 2.
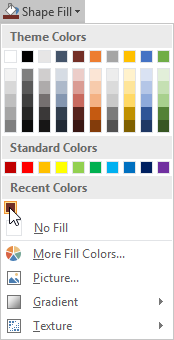
Figure 2. Any custom colors you create appear below the Recent Colors heading in the Shape Fill menu.
Choosing the color from the Shape Fill menu is handy, but it doesn’t help you do apply that color to another document. Sometimes, it’s just easier to copy down the discrete RGB (Red, Green, Blue) color values from the Color dialog box and just re-create the color.
If you save the document with the new colors as a template, then the custom colors are retained, just as shown in Figure 2. That might be the best solution, but it still doesn’t help share that color with other documents.
