
Crafting a table in Microsoft Word need not be a source of pain, woe, and frustration.
One of the reasons people get frustrated with Word’s tables is formatting. A cell in a table is not a paragraph in Word. So immediately you need to toss out all the basic paragraph-formatting rules you’ve memorized for writing text. Indents, tabs, and other common formats are just going to look funky in a table.
This predicament recently frustrated one of my readers. He was trying to format a table with various fill-in-the-blanks items. So the table contained one column of questions and then two columns that were blank.
At various spots in the second and third columns, he had typed a bunch of underlines. That’s one way to create a fill-in-the-blank item, but I know a better trick.
Instead of using underlines, you create an underscore dot leader tab stop. The problem there is that you can’t really work with tab stops in a table; in Word the Tab key moves from cell to cell while you’re editing a table. So, for a moment, it looked like multiple underline characters was the only way to underline. But that’s not really the case.
There is a marriage in Word between the Table command and the Borders command. They both meet at the same place, where you can use the Borders command to festoon a table with all sorts of lines: thick, thin, double, fancy, and so on.
To fake underlines in a table, you must first remove all the lines highlighting the table. Effectively, you need to render the table invisible for the final, printed document:
1. Select the table: Click the mouse in the tiny four-arrow box in the table’s upper left corner.
2. Click the Table Tools Design tab.
3. Choose Borders (in the Table Styles group) to display the menu.
4. Choose None to ensure that all the borders in and around the table are gone.
The problem with zapping all the borders is that you can’t see what you’re doing. So:
5. Select the table again (Step 1) if necessary.
6. Chose the Borders menu again, and choose the option View Gridlines.
The table now shows up with gridlines, like ant marching over the cell borders, as shown in Figure 1.
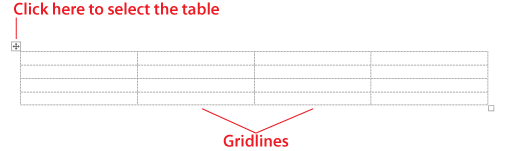
Figure 2. Setting gridlines in a table.
You can now see how the table lays out. The gridlines won’t print (unless you tell Word to print them).
To underline a specific cell, you need to activate the cell’s bottom border
7. Click the mouse in the cell where you want an underline.
8. Choose Borders>Borders and Shading.
The Borders and Shading dialog box appears, shown in Figure 2.
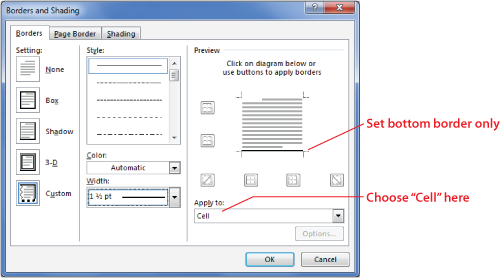
Figure 2. The Borders and Shading dialog box.
9. Choose a line style from the Style menu, such as a single or double line for a single or double underline for that cell.
10. In the Preview window, click the bottom part of the text grid so that the underline appears only on the bottom of the preview diagram, such as is shown in Figure 2.
11. In the Apply to drop-down, choose Cell.
12. Don’t skip Step 11; you need to choose Cell or the underline style isn’t applied.
13. Click OK.
The underline is now part of the table format, a highlight in the grid. If you choose a single line, you get a single line, double lines make doubles. You can type text in the cell and it doesn’t change the line.
You’ll need to apply the border format to each cell where you desire the underline. No need to worry about typing underscores or applying the underline character format, or messing with dot leader tab stops.
