
While exploring the possibilities of the various object-fill color commands in Word, I stumbled across a most amazing tool: the gradient. You can use Word to create and apply gradient colors to objects, text, and a host of interesting items. That’s neat, but what the heck is a gradient?
A gradient is a mixture of two or more colors. The colors band together, forming an interesting pattern — if you create the gradient correctly.
In Word, gradients are applied to various objects as either fill colors or sometimes border colors. To experiment with a gradient in Word, plop down a shape into your document. Follow these steps:
1. Click the Insert tab.
2. In the Illustrations group, click the Shape menu.
3. Choose the Rectangle shape.
4. Drag the mouse to draw a rectangle in your document.
The shape appears somewhat like Figure 1.
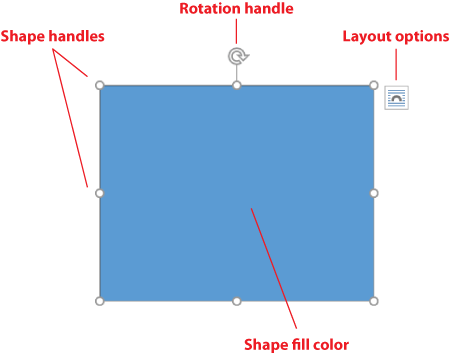
Figure 1. A shape in a Word document.
In Figure 1, the object’s fill is a solid color. The document theme determines the color, so for a Normal document the default theme object fill color is Blue Accent 1. Whatever. You can change the color to a gradient:
5. Click the Drawing Tools Format tab.
6. In the Shape Styles group, click the Shape Fill button.
7. Choose Gradient, More Gradients from the menu.
The Format Shape pane appears with the Fill tab selected.
8. Choose Gradient File from the list.
The Gradient portion of the Format Shape pane appears, as shown in Figure 2.
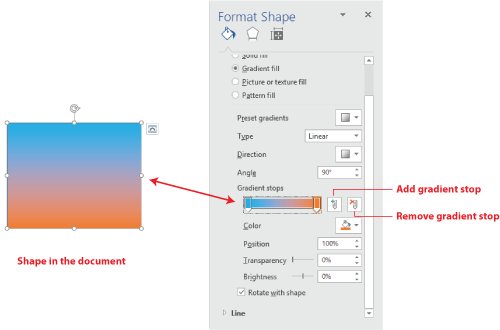
Figure 2. Creating and applying a gradient to a shape.
Use the controls in the Format Shape pane to customize the gradient and apply it to the selected object, such as the rectangle shown in Figure 1.
You can choose a preset gradient, which is the easiest way to chicken out. Otherwise, you set the gradient type, the direction, and most importantly the gradient stops. It’s the gradient stops that build the colors.
To set a gradient stop, click the Plus button (refer to Figure 2). Click the Color button to set the stop’s color. Then slide the stop left or right to see how it affects the object in your document.
To remove a stop, drag it from the Gradient Stops bar or click it once and then click the Remove button.
Unlike other Word coloring commands, feedback from the Format Shape pane is instant, so you can immediately see what effect the settings make on the image in your document. That’s a great way to experiment with other gradient types and directions in the Format Picture pane to get the exact effect you want.
Close the Format Shape pane when you’re done creating the gradient.
For Friday’s blog post, I’ll show you some gradient examples and how the controls in the Format Shape pane relate to the end results.
